TL;DR: Updated stand design; making progress on firmware; resolving issues with injection molded parts; PVT looking like December, with mass production to follow.
Hello from Oakland!
Electrical Engineering
When we last wrote, we told you about a buzzing issue we’d been tracking in our Chinese-made PCBs. We got some help from Seeed on a proposed fix that dramatically reduced, but did not eliminate the buzzing. As we tested Seeed’s fix, we discovered that it also caused a heat issue when the boards were run with the LEDs turned up to a higher brightness.
After a couple weeks of the factory’s EE being unable to find the source of the problem, we begged a favor from Input Club’s Jacob Alexander. The heat problem turned out to be pretty simple. The inductors Seeed had picked max out at 1A of current, while we let you configure the LEDs to draw a bit over 1.5A.
Additionally, as we’ve been putting our test boards through some stress testing here in Oakland, we found that the RJ45 and USB Type C connectors the factory’s suppliers had recommended in place of the foreign brands we’d originally specified weren’t hitting the reliability levels we wanted. One of the RJ45 connectors had a bit of its plastic crack, stopping the interconnect cable from locking in place. The USB Type C connector started off doing a really good job holding a cable in place. After a few weeks of frequent cable insertions and removals, it just wasn’t as “grabby” as it had been when starting off. It still works fine, but we’re concerned that it might not have the longevity we want. The factory is working with their suppliers to source higher quality parts in both cases. Thankfully, neither part will require a PCB change. We’ve been atypically rough on these test boards to try to make sure that your keyboard will be sturdy and reliable. It’s probably the case that the existing parts would have been fine, but since we’re still waiting on some of the mechanical updates, we have the opportunity to do better.
The factory’s brought in outside EE resources to help them finish triage and tune the inductor and capacitor selections. The delay has been frustrating, but we hope to have that resolved this week. They’ll send us a set of boards for final testing. Once we give the thumbs up, they’ll be locked down for production.
We also had an interesting moment when the factory notified us that the keyswitches they’d received for our PVT (production validation test) run had been recalled due to a defect. Thankfully, upgraded replacement switches were delivered on October 25.
Firmware
A lot’s happened on the firmware front in the past month.
As we’ve mentioned before, we’re using an ATMega32U4 microcontroller as the Model 01’s ‘brain’ and using a pair of ATTiny88 microcontrollers as the keyscanners & LED controllers.
For “day to day” reprogramming, reprogramming the Model 01 is pretty straight forward: just hold down the “Prog” key while using Arduino, avrdude, or another firmware flashing tool. This is what you’d use to update the keyboard’s firmware, change key layouts, or customize the LED effects.
If you want to do really crazy things with key debouncing, you might have to reprogram the ATTiny88s. One of the things that’s worried us is that while the 32U4 is easy to reprogram over USB, the ATTiny88s are buried inside the keyboard. We’re including standard ICSP headers so that you’re able to reflash the bootloader on the ATmega32U4 or either ATTiny88 by unscrewing the keyboard’s enclosure.
We’re happy to report that we now have a tested solution for reprogramming the ATTiny88s without using a screwdriver or an external programmer. With help from our friend Chris Swenson, we modernized (and significantly overhauled) the I2C bootloader for ATTiny microcontrollers Atmel released in an ancient tech-note. You can now use your Model 01’s ATmega32U4 to program the ATTiny88s using a custom firmware program.
Now that we’ve built this functionality, we’re hopeful that you’ll never, ever need it. But if we do need to update the ATTiny88 firmware on your Model 01, it will now be mildly irksome, rather than a frustrating process that requires detailed instructions and additional hardware.
On the keyboard firmware front, a lot’s happened. Last month, we mentioned that Gergely Nagy had started building a custom feature for the Model 01 he didn’t have yet. Since then, he built an entire custom firmware for the Model 01 that he still doesn’t have, submitting patches to our libraries as we went. As we talked on IRC, we somehow suckered him into adding a couple neat extension mechanisms to the core Model 01 firmware and rebuilding the features he’d built as plugins. You can follow along here: https://github.com/algernon/Akela
You’re also welcome to join us on #keyboardio on Freenode IRC.
At the same time, we’ve been working to streamline the core firmware and to add the factory test mode we mentioned in the last backer update.
Stand design
When we last wrote, we showed some work-in-progress pictures of the new stands which will let you customize the tent and tilt angles of the Model 01. The stands screw into the standard ¼-20 tripod mounts on the bottom side of each half of the keyboard.
The versions of the stands we showed were works in progress, CNC milled out of blocks of yellow ABS plastic. To try to give you an idea of what the stands might look like, we shot photographs of the keyboard at an angle designed to show the stands off. That…might not have been the best idea. A number of you were concerned that the stands would look big and ugly and blocky. That’s very much not what we want.
After the last backer update, we kept iterating on the design and have ended up with something we think looks a lot nicer, is more portable and is a bit more stable. Please keep in mind that the production version of the new stand will be black or off-black, not white.
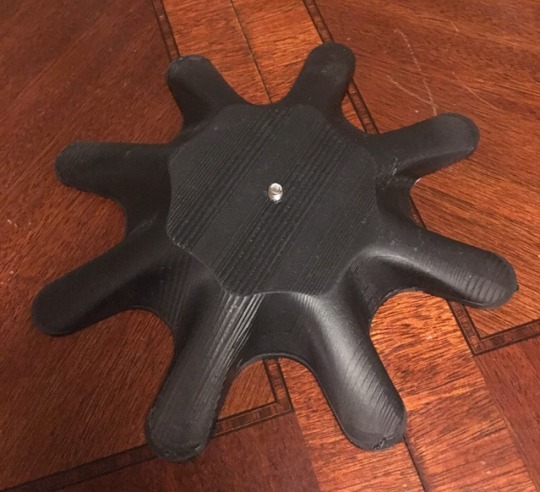
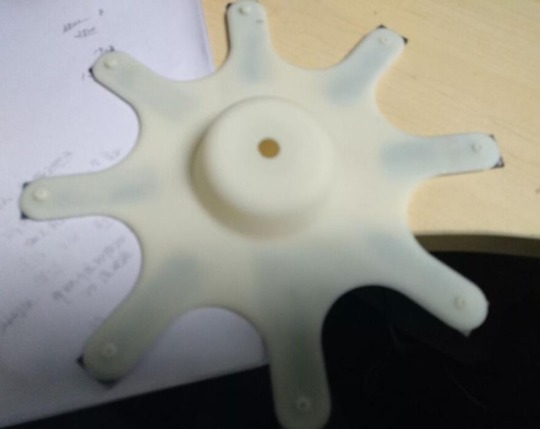
This is what the new stand looks like. Keep in mind that this one was poorly CNC milled by Jesse in our garage. The real stands won’t look so bumpy.
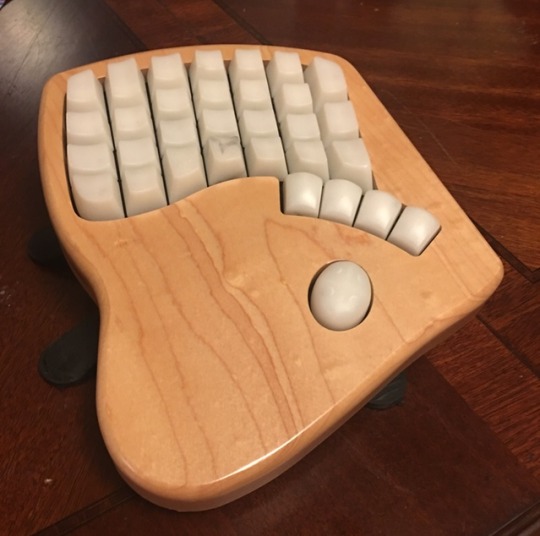
This is what the new stand looks like with a keyboard on top of it.
We’ve been through a half-dozen iterations since last month. This is, we believe, the final version. The factory is currently getting quotations for injection molding tooling from a few suppliers. It’s looking like about 25 days lead time to the first items coming off the production line. It currently looks like everything else will be ready to roll a few weeks before that. To try to ensure that the stands don’t delay the PVT run, we’re going to attempt to have the wood CNC factory do a run of 100 sets of wooden stands. We know that some folks are going to want wooden stands and hope to offer them as an after-market item later, too.
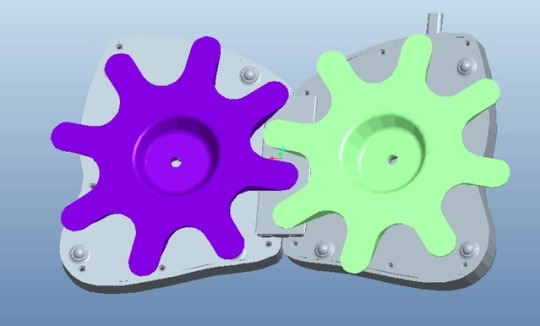
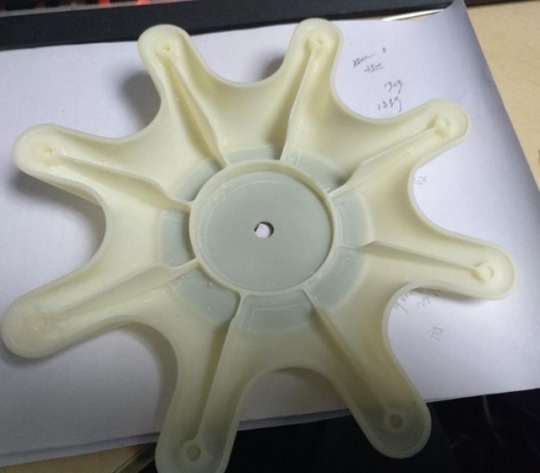
The new stands are shaped like.. eight legged starfish? The factory calls it them starfish, though we think of ‘em as a little bit more octopus-like. This shows how the two of them fit together. They’ll be black, not purple and green, though.
The plastic stands will be injection molded in two parts that are snapped and screwed together at the factory. We’ve been through a couple of iterations of the design for the internals of the stand, mostly focused on ensuring that the stand is sturdy, rigid and lightweight.
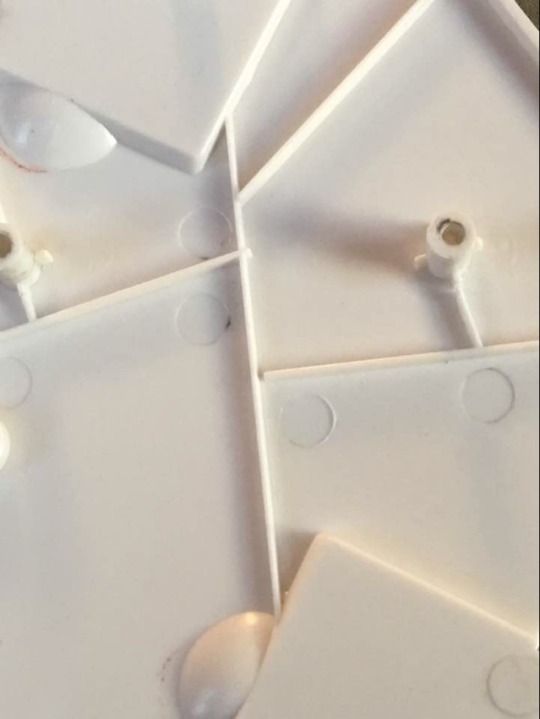
There was a point where the factory thought they were going to have to make custom tripod screws to screw the stands to the baseplates. Thankfully, they found a vendor with..a pretty broad product catalog.
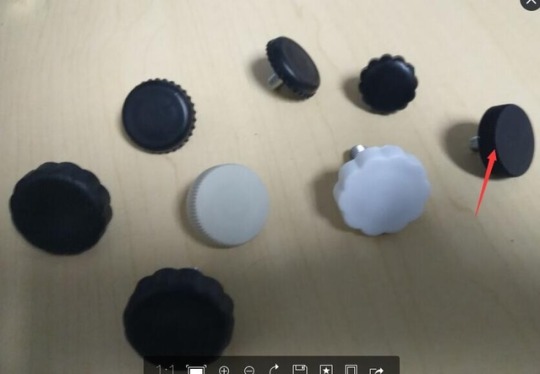
These are a few of the screw options the vendor sent over, with an arrow pointing at the Mechanical Engineer’s recommendation.
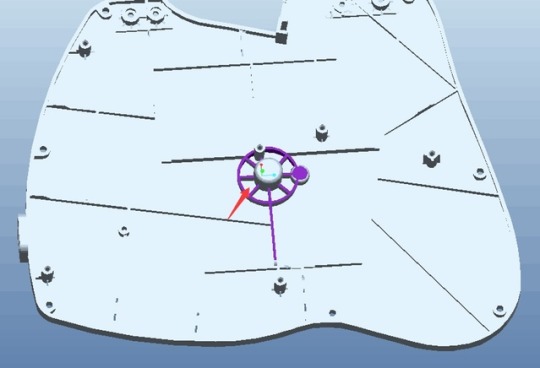
The inside of the bottom half of the new stand design. Since this picture was taken, the factory’s added a bit of additional structure. Rest assured that the final article will be a much less noticeable black, with better fitting rubber pads.
The inside of the top half of the new stands.
Baseplates
After we removed the old flip-out feet, the baseplates needed to be updated to remove the cavities for the feet.
At the same time, we found that the plastic on the inside of the tripod mount didn’t have enough extra headroom above it–if you screwed in a tripod screw that was a little bit too long, it was possible to damage the plastic. We ended up just adding a little bit of an additional air gap above the tripod screw.
As we’ve been working with the T3 sample base plates provided by the factory when Jesse was last in Shenzhen, we’ve found them to have just a little too much flex when you have something screwed into the tripod mount. This is largely due to deficiencies in the “ribbing” on the inside of the baseplates. As we started to look at the ribbing, we discovered that there were a number of places where the ribbing on the injection-molded baseplates didn’t match the CNC-milled samples we’d seen earlier.
The T3 baseplate samples were pretty bad. There were places that the bits of ribbing didn’t even connect (like in the middle of this picture).
Simply fixing the mistakes made by the mold tooling company would have gone a long way to reducing base-plate flex, but since we already had to make significant changes to remove the feet, we took the opportunity to add better internal reinforcement. When the factory brought the updated design to their tooling factory, the tooling factory suggested additional changes. Over the past week, we’ve been going back and forth to try to get to something we can sign off on. That should happen in the next couple days. Once it does, the tooling modifications are estimated to take two weeks.
This baseplate design had some additional structure added to help reinforce the tripod mount at the injection molding factory’s suggestion.
Center bars
The center bars that join the two halves of the keyboard need only relatively minor design updates to remove the flip-out feet. Essentially, we’re cutting off part of the tented center bar, making it half the height it was before. Unfortunately, that’s something that’s relatively hard to change in an injection mold. In order for a part to come out of the mold smaller, you need to put steel back into the mold (or recut it.) The lead time for center bar updates is the same as for the bottom plates–about two weeks.
Rails
The rails are the little bits on the bottom of the key plates that the center bars slide onto. When we wrote about the drop tests last month, we mentioned that the tapping screws securing the rails started to get a bit loose after the keyboard hit a concrete floor. The factory has updated the design of the rails to add brass inserts into the rails, so we can use machine screws instead of tapping screws.
The brass inserts are added into the injection molds and the rails are molded around the inserts, just like the tripod mount. When we asked about what sorts of modifications the mold needed to do this, we were surprised to learn that this gets done without any change to the tooling.
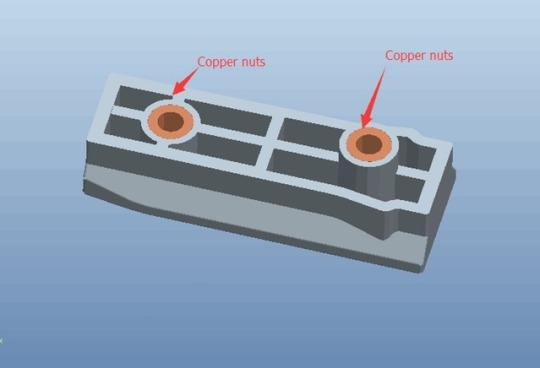
The nuts that will be inserted into the rails are brass, despite the comment to the contrary in these pictures.

An engineering drawing showing where the brass nuts will be inserted into the rails.
Enclosure
As we’ve been stress-testing the samples Jesse brought back from Shenzhen last month, we’ve been finding the fit between the plastic base plates and the wooden enclosures to be a very, very tight fit. Tight enough that we’re concerned that the plastic could put too much pressure on the wood, causing a crack somewhere down the line. We brought this up with the factory, who checked out all of the tolerances and found that the wood was a little bit (less than 1mm) fatter than it should be. They brought this up with the wood CNC factory who agreed, saying that it was likely a result of the post-milling finishing operations. The CNC factory said that they’d recommend some small adjustments to the thickness of the wood in a few places to give everything a bit more breathing room. A team from our factory is visiting the CNC operation on Wednesday to go over the details. Because the wood is milled rather than injection-molded, once we update the design, the lead time for the change is just a day or two of machine programming time.
The other enclosure-related item is the press-fit nuts we’re using to let you screw the base plate to the enclosure with machine screws. As we mentioned in a previous update, the factory didn’t like the knife-edge nuts we’d used previously. They prefer nuts that are just inserted vertically, rather than screwed in, saying that it leads to fewer broken parts. We had some concerns that the press-fit versions wouldn’t stay in place well, even when glued.
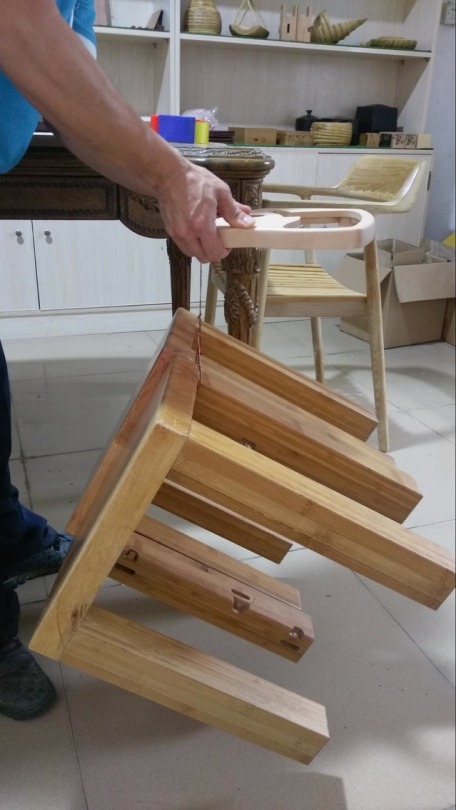
The wood factory sent us some pictures and video to show off just how strong the glue is. That’s a 10.4 kg table they’re using as a weight.
It took a bit of back and forth to find out what kind of glue they’re using. Early on, it sounded like they were recommending a cyanoacrylate superglue. That holds great, but gets brittle and is unlikely to do a good job bonding the metal to the wood. The glue they’re using is a wood furniture glue that should do a good job flowing around the exterior “bar-bell” shape of the nut and anchor it to the wood. The glue comes from the Chinese subsidiary of a major German adhesives company we know and trust. Interestingly, while it was easy to verify the brand and product line of the glue, the exact product ID is a China-only product. When we first called the manufacturer, they couldn’t find any record of it existing. We were a little bit concerned until we managed to track down references to it as a furniture glue on their Chinese website.
Keycaps
Last week, the factory reported to us that the keycap manufacturer had finished T5 - the fifth update to the tooling for the keycaps. The keycaps we showed in the last backer update were “T3” keycaps. They were the first version that had numbers molded on the inside. Some of the numbers were placed…idiosyncratically. And some of the ejector pins that help push the keycaps out of the injection mold after tooling were slightly…miscalibrated, resulting in visible dots on the top sides of the keycaps. On the inside of the keycaps, the T3 keystems were the right size, but were missing a 45 degree chamfer at their tips. That chamfer makes the keycaps much, much easier to insert into the keyswitches. The T4 keycap update corrected the keystem chamfers and most of the key numbers. The factory reported that some of the numbers were still hard to read, so they were being corrected for T5. Supposedly, the ejector pins have been correctly calibrated, too, but we won’t know for sure until we have a set of keycaps to test.

A sample T3 keycap showing off the cosmetic issue caused by misaligned ejector pins.
The first set of sample keycaps we got from the factory were “natural” colored–a translucent yellow-white color. We’ve been working with the factory to up the light-transmission of the production keycaps.
The factory expects to send us a set of blank white T5 keycaps today, with a painted and engraved set of QWERTY keycaps to follow soon afterward. (As of this writing, we’ve seen a photograph of an airbill for the blank keycaps.) They were very curious about some aspects of our key layout. Attempting to explain to the factory exactly what an “any” key and a “butterfly” key are supposed to do was an amusing moment.
Key labels
While we’ve been reasonably on top of the QWERTY key labels for the Model 01, we’ve long known that we’d want help specifying the legends for any non-QWERTY layouts we end up offering. This month, we started setting up a forum site for the Model 01.
We made the decision that rather than just throwing the doors wide open, we’d start by inviting folks who filled out the key layout survey we promoted in the past few backer updates and expressed interest in helping to shape the layouts.
We feel pretty strongly that a public forum site for a product that nobody has yet isn’t exactly a great experience. As we start to ship the first Model 01s, we’ll make the forum public. Until then, we’re happy to keep chatting in the Kickstarter comment thread.
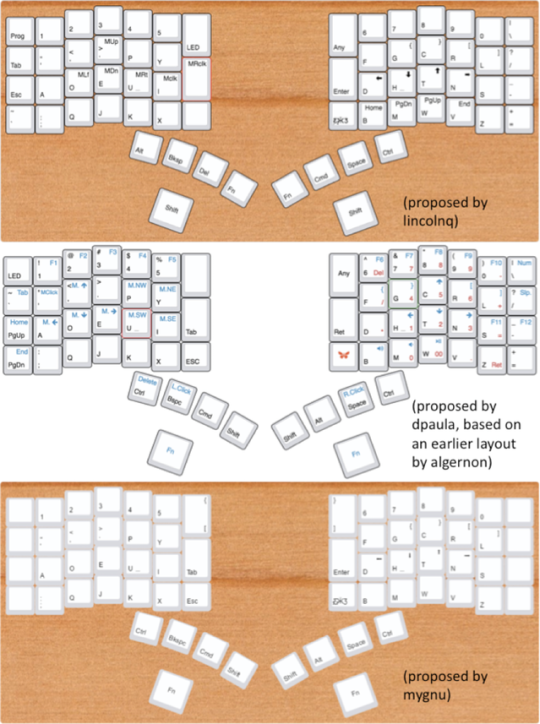
To give you a taste of what folks are talking about for the alternate layouts, here are some sample Dvorak layout proposals.
If you’re interested in helping to shape the Dvorak, Colemak or Runic key layouts, send mail to kaia@keyboard.io with the subject “Forum invite” and we’ll get you sorted out.
Packaging
This week, the factory’s bringing in a company specializing in packaging design to propose a box design to us. We know roughly what we’re looking for (and it won’t be all that complex), but a packaging specialist will help design something robust and reliable that won’t break the bank. Lead time on packaging is 7-10 days if it’s all cardboard, stretching to 2 weeks if we have plastic packaging.
Cables
We’ve been going back and forth with the factory about the USB Type C cables that will be shipped with the Model 01. What we’ve specified is a black 1.5 meter cable with a regular USB connector (USB A) on one side and a right-angle USB Type C connector on the other end. Right angle Type C connectors are still not the most common thing. Early on, the factory had some trouble sourcing them. The last time we were in Shenzhen, we found a couple of potential vendors. The factory has also found their own source, though theirs are a bit pricier than ours. They’re getting samples from all the vendors to put through their paces. Lead times for thousands of cables is something like 10-15 days.
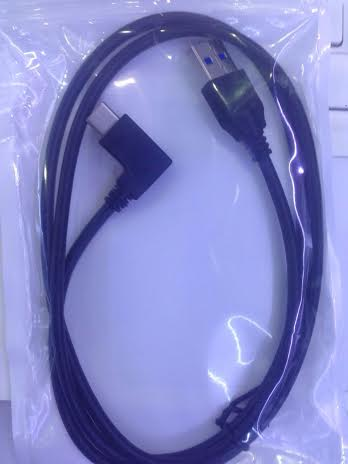
A 1.5 meter long right-angle Type C to USB A cable.
The short and long RJ45 cables we’ll ship with the keyboards are a lot more straight-forward.
Screwdriver
Your Model 01 comes with source code and a screwdriver. Last week, the factory sent us photographs of some sample screwdrivers to pick from. They pushed back a bit when we brought up having the Keyboardio logo on the screwdrivers. They told us that the cost and lead-time of doing that would be prohibitive. It took a bit of back and forth before we discovered that they thought we wanted the screwdriver vendor to modify their injection molds to mold the logo into the screwdriver. While it would be really cool to have our logo literally baked into the screwdrivers, we’ve only been planning on having the logo screenprinted on the screwdriver. Once we were on the same page about the logo, the conversation went much more smoothly.
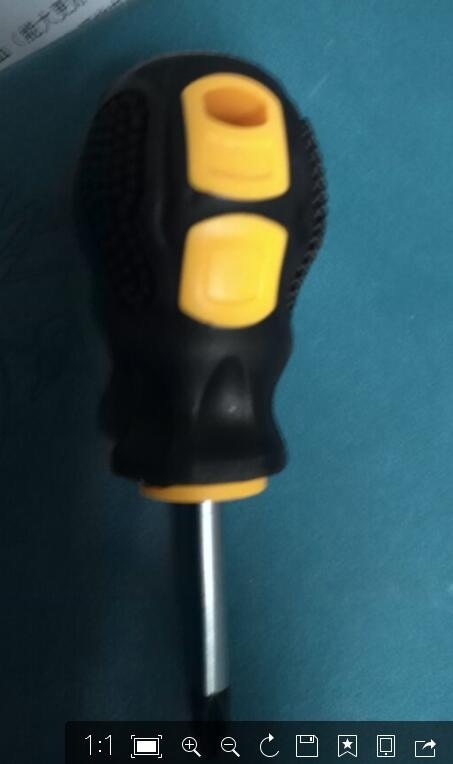
This is probably the screwdriver that will come with your Model 01
Schedule
Last month, we told you we were betting that we expected the first units to start shipping from the factory by the end of November. At this point, that’s not entirely impossible, but it’s relatively improbable.
Right now, the longest-leadtime items are the injection tooling for the new stands and the tooling updates for the baseplates and center bars. We can ship the 100 unit PVT run with CNC milled stands, but we can’t ship it with the old baseplates and center bars.
Once the first PVT units are in customer hands and we’ve verified that things look alright, we’ll ask the factory to start mass production. That doesn’t mean that one week after PVT units are delivered, we’ll have a warehouse full of several thousand Model 01s. Keyboards involve some hand assembly and hand testing (like just about everything). We’ll ship your keyboards as quickly as the factory can make them, though.
Family
At some point in the next month, we’re probably going to be offline for most of a week as we welcome a new small person into the family. We’ll post a birth announcement to Twitter ;)
<3 j+k